Review – Junk Planet Warrior Armor Upgrade
The upgrade kit for use with the official Transformers Generations Junkheap* or Transformers Reveal the Shield Wreckgar* toys has arrived and is mostly very cool. There are a couple of minor problems with the kit, but for the most part what we get in the box is an excellent way to turn an existing Transformers toy into a new character.


Packaging
A clean and simple box design, the Junk Planet Warrior Armor Upgrade package looks nice but could have been improved with either photos of the included components or an illustration showing off the upgraded character. But the box works, and there’s a simple photo on the Ace’s Toy Store order page, so I’ll set the box aside and move to what we’re all really interested in: the upgrade components.

Remove Original Pieces
The set doesn’t come with any instructions, but if you look at photos online it’s pretty easy to figure out how to add the new parts. Pop off the original toy’s head and the wheel assembly from the arm — both parts are on ball joints — and remove the original axe weapon. And that’s it. Toss those parts in a box and then grab your new components and start snapping them on.

Adding the New Parts
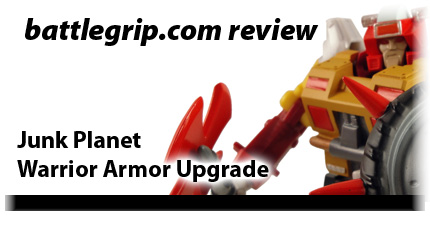
- Head – The new head is the biggest problem with the upgrade kit; mine doesn’t slot neatly over the ball so the head’s loose and floppy. It just isn’t connected at all and more rests on top of the body.
- Chest – This is a great idea. You have to remove the chest to transform the toy back into motorcycle mode, but snapping it on is easy and the chest holds in place without any trouble at all.
- Armored Crotch – As with the chest, the new crotch snaps right over the old one and holds on nicely. You have to remove this to transform the toy, but since I plan to display the upgraded toy in robot mode I’m not that worried about the fact that the parts don’t stay on when transforming the toy.

- Knee Pads – Again, these slide on over the old knees. The inner shapes of the knee pads align with the existing toy, so one is clearly the left and one is clearly the right. And yes, these need to come off to transform the toy.
- Shoulder Pad – The toy’s left arm gets an upgrade with a spiked shoulder pad. All but the head really do secure nicely in place.
- Axe – As simple as popping the axe into the toy’s hand. Nice and snug fit without any issues at all.
- Wheel Shield – This tabs into place on the forearm and looks fantastic. The outer spike has to be stuck in — and is pretty loose so I’ll be gluing this — but once you have everything in place the kit works really well and gives the toy a completely new look.

Sculpt and Paint
The colors are not an exact match, but they’re close enough that the upgraded figure really does look neat. And I love how the new parts give the figure a thick, heavy look once the new chest and crotch in place, and the blocky head goes nicely with the new body. The paint’s pretty clean; click any of the photos for a close look at the detail and the paint. There’s a little roughness on the painted red spots on the chest, but nothing you shouldn’t expect to see from a semi-mass produced toy.

Made of Resin
A bit surprisingly for a mass-produced upgrade kit, the Junk Warrior Armor Upgrade is made of resin parts; but don’t worry, for the most part they feel quite durable and should work great if all you’re doing is displaying the upgraded toy. My only two concerns are:
- That head not fitting is annoying and I worry it’s going to fall off when I move/carry the toy.
- Fitting in the shield was a bit scary since the resin tab is thin and it’s a very tight fit into the slot on the original toy. I don’t think I’ll ever want to remove the shield now that I have it in place.

Closing Thoughts
At $55 the Junk Planet Warrior Armor Upgrade is a pricey add-on for the Transformers Generations Junkheap* or Transformers Reveal the Shield Wreckgar* toys, but if you’re looking to army build Junkions and are a fan of the official mold I suggest trying one of these sets. It gives the toy a completely new look and expands your Junkion army quite nicely.
The head and shield are weak spots, and the price is high, but overall I’m happy with the quality of the set. I’m pretty sure some new photos are gonna be shot so that this kit can make an appearance in the Transforming Collections book (Kickstarter page).
Philip Reed now wants to create the Junkion upgrade he had in mind more than he did before opening this pack. He just needs to find the time to work out the design and then find someone to help take the sketches from a concept to a finished sculpt.

Great review Phil. A trick I learned with ball and socket joints is to use a small amount of crazy glue in the socket. Slosh it around inside so it dries evenly and doesn’t pool. This has always worked for me with DCUC figures so it should work in this case. I picked up 4 Junkheap figures a while back hoping you would give this kit a good review. Thanks.
I don’t know, the add on parts look great and all, but when a Transformers no longer Transforms…
He is an ActionMaster! It looks a little too bulky for my taste.
@Jonathan – If you’re after this I suggest grabbing just one set. You definitely don’t need more than one of these no matter how much you love Junkions.
And thanks for the tip! May have to try that.
@Black Zarak – Well, I’ve got a number of Transformers toys that _I_ can’t transform completely. 😉 (Reveal the Shield Perceptor just doesn’t align and tab together perfectly for me.)
@Marv – It’s the bulky look that I like most about this set.
Hahaha, well Perceptor just suffers from poor shoulder engineering, it’s not his fault.
Hi Phillip,
Good review of the kit. I didn’t see any reference to its origins though: a customizer who goes by MAIDEN JAPAN at tfw2005’s Radicon forums sculpted / replicated the originals, and a 3rd party manufacturer picked up some of the designs for distribution. He also has some excellent add-ons for other figures, such as the Fansproject ‘not-Insecticons’.
http://www.tfw2005.com/boards/commissioner-listing-feedback/374962-wreck-gar-custom-add-parts.html
It was nice to see that the Ace’s Toy Store version was done in co-operation with the original artist. Too often, you’ll see 3rd party Transformer accessories, articulated hands, or weapons add-ons, and they look like modified re-moulds of prominent TF Shapways kits, and no credit is given to the original designer (for inspiration, or otherwise).
I own one of the original unpainted maidenjapan heads for my junkeon, and it was done in a yellow resin. It fit perfectly on the original figure though. Perhaps yours not was a side effect of the remolding/replication process.
Keep up the great reviews. You’re the first kickstarter I’ve ever backed, so I’m really looking forward to your book.
-Blayne
Custom Toys & Action Figures
@Black Zarak – So he’s not a bad Transformer, he’s just built that way?
@Blayne – Thanks for including the link! I had mentioned the kit so many times before this review I didn’t think it was a good idea to go over that again; but I think you’re right and it’s best if all of the info is included here.
And thank you for supporting the project!
Don’t use superglue. A small drop of Pledge Floor Polish with Future Shine (that part is important) will tighten up just about any joint if you let it dry for an hour or two, and it washes off with water if you mess up. Works great with floppy limbs, too. It’ll wear off eventually if you move it around a lot, but then you can just reapply it.